Wednesday, 2 December 2015

What's in my bag?

Hey guys welcome to another post in BucketUrPhotos!

Some of you guys were wondering what lenses and gear i use for my photography shooting. I do have a couple of lenses and stuff but they are not as 'outstanding' like the ones pros use. (This is considered a STARTER PACK by the way so you can now guess how much it costs to get a set of gear. Not to mention i still don't have an Ultra wide angle lens )

FROM LEFT TO RIGHT:


  1. Yongnuo YN560-III manual Flashgun with diffuser box

    A cheap starter flashgun that works well for me in most situations. Although sometimes while shooting in burst mode some shots will not have flash fired (in other words some shots will be dark). Adding a diffuser box enables the flashgun light to be distributed around the surrounding, as opposed to light travelling straight when flash fired without diffuser box.

    (future blog post will cover on usage of flashgun vs popup flash and also explain differences between manual and TTL flashes)
  2. Canon EOS 700D (or Rebel T5i) Body
    Released in 2013 as successor to the 650D (though literally no difference except for the exterior), the 18 megapixel 700D is a really good camera for entry level photography. It is the second iteration of cameras that has a swiveling (vari-angle) LCD and a touch screen which enables to select your target to focus and shoot. Canon has a easy to use interface and the buttons are well placed for easy changing of camera settings. The dial (which has different modes) is now a full 360 degree turning one. Though the FPS (frames per second) of only 5 isn't that impressive and that the camera buffer, which slows down to a crawl after firing 7 shots continuously, it is still a good all rounded basic camera.

    It is an APS-C sensor camera so there is a crop factor of 1.6x (as mentioned in previous posts). No matter what lens you use, the crop factor still applies. (refer to EF vs EF-S lenses showdown)

    In 2015, the 700D has been succeeded by the 750D (T6i) and the 760D (T6s) which sports a new 24.2 megapixel camera and the 760D has a secondary LCD on top of the body, similar to the more professional models such as Canon 5D mark III, 7D mark II and so on. (review on 750S and 760D vs 700D coming soon)
    -
  3. Canon EF-S 18-135mm f/3.5-5.6 IS STM lens
    Coming with the 700D body when you get the Kit II, this 18-135mm lens is the best lens to start out with. it gives more range than the 18-55mm lens (a.k.a the lens given if you buy Kit I) and thus enable you to shoot from further distance without going closer to your subject. However 18mm is not as wide but will get the job done on most basis. (18mm * 1.6 crop factor = 28.8mm)

    However while zooming in, the lens aperture changes and therefore shots get darker if you zoom in (most zoom lenses are like that, except for those with 'constant aperture' which stays in the same aperture even while zooming.) At 18mm the aperture can be at the widest aperture of f/3.5 but as zooming in it will change untilyou reach 135mm, where the aperture will be at f/5.6 (thus the reason why it goes darker). One way to counter this is to set f/5.6 aperture right from 18mm (but that would mean you have to compensate for the narrow aperture)

    All in all, it is a well all rounded lens at an affordable package. I highly recommend to get the camera body with this lens as you need not invest in other lenses that quickly (though it will be slightly heavier BUT better build quality than the 18-55mm lens*)

    Unfortunately this is an EF-S lens. This can only be used on APS-C sensor (also called crop) DSLRs so if you're upgrading to full frame, you would have to purchase with a zoom lens.
    Maybe a Full Frame camera with 24-105mm f/4 IS USM L lens or the 24-70mm f/4 IS USM lens. (It has the L lens which is a really good and 'professional' lens, more explained on Canon L lens in future posts)

    *18-55mm lens has a plastic mount which is 'cheap' feeling and the durability is not as fantastic as this lens which has a more solid build and a metal mount.
  4. Tamron 70-300mm f/4-5.6 Di VC USD Telephoto lens

    Do not confuse this with the old obsolete older brother, the  Tamron 70-300mm f/4-5.6 LD Di Macro Lens. This 70-300mm lens is  Image Stabilisation, which Tamron calls it Vibration Control (VC).

    This lens is Tamron's first lens to have ultra sonic motor focusing, which they call it Ultrasonic Silent Drive (USD) and it has a distance indicator in the focusing ring so you can see and control the focus ring better based on distance while focusing manually. It offers Full Time Manual Focusing (FTM) which means you can turn the focus ring around even when you set it to Auto Focus.

    However one problem is that there is no Lock switch to prevent the lens barrel from turning. This is not a deal breaker but you got to watch out while carrying it, especially with its hood attached onto the lens from your bag.

    (speaking of hood, the hood is where my lens blower and cleaning kit are in)

    The image quality is really good, and price wise it costs about $400 USD (depends where you look) but you can also opt for second hand which is cheaper). Shooting with slower shutter speed at 300mm is now possible thanks to its really good VC. This lens can be used on full frame DSLR so you need not worry about whether it can be used on them or not.

    This lens has an advantage for APS-C camera users. Thanks to its crop factor of 1.6 (for Canon DSLR, other brand is 1.5), at 300mm it gives a view of 480mm and therefore allowing to shoot objects further from you, compared to full frame which does not have the crop factor and thus the view is at 300mm.

    One annoying thing is the variable aperture, but as mentioned before, it is normal for zoom lenses to have this. At 70mm it is widest at f/4 and zoom in to 300mm it will progress and come to f/5.6. As mentioned before you can set it to f/5.6 and above to prevent the 'aperture transition' while zooming in.(though you have to compensate for correct exposure)
  5. Canon EF 50mm f/1.8 STM lens
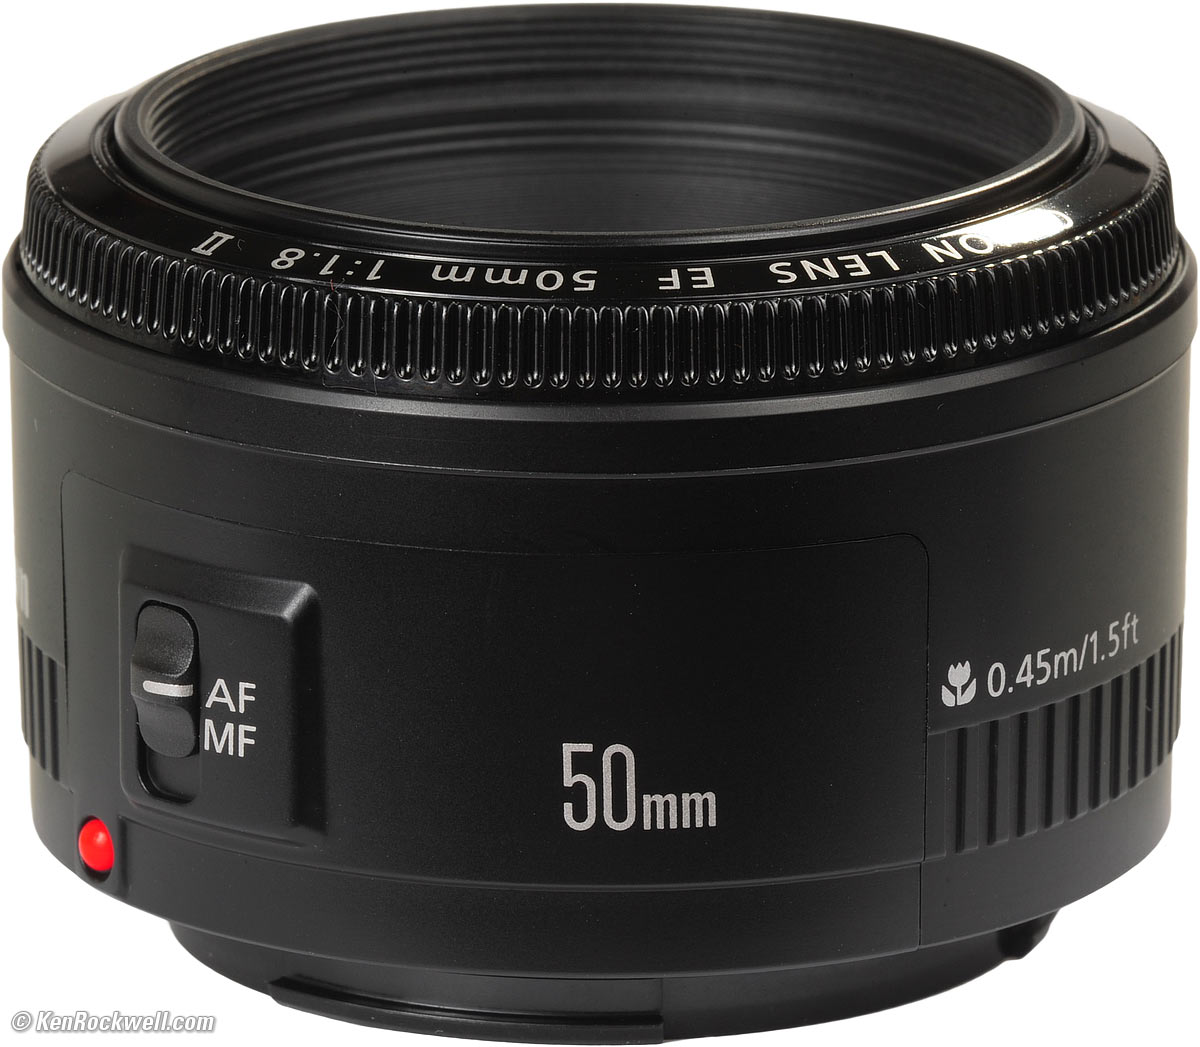
    Cheapest lens in the Canon lineup, this little boy has a very wide aperture of f/1.8 and the build quality, though still plastic, is now better compared to the Mark II version which had cheap build quality and plastic mount (the STM version has Metal mount and better quality build). This lens is best used on full frame as 50mm is a very useful focal length. On APS-C however the focal length is now 80mm (1.6x multiplication) which is a bit narrow but still useable. This is a very cheap and good option for people who are looking for lenses with wider apertures.

    This lens does not have Image Stabilisation so You would have to shoot at 1/50 (for full frame) or 1/80 (for crop_ and faster to prevent shake while shooting handheld. But hey the f/1.8 should be able to compensate for that.

    Speaking of which, shooting at f/1.8 is not recommended for shooting a group of people (unless all of them are of the same distance) as sometimes the focus might ONLY be on one person and the rest are all blurred. More will be discussed in future posts.
  6. Cleaning Kit
    You will definitely get dust on your lenses or inside your camera so you need a cleaning kit. Get a lens brush, some ear buds (you don't need to buy separately, just the normal ones you use), micro fiber cloth (best to clean smudges and dirt) and a lens blower (to blow dust out from  your lens / camera sensor. HOWEVER be very cautious if you are cleaning inside your camera, especially your sensor. One small move and your sensor can be damaged or scratched,
     
  7. Camera bags (not in picture)

    I use a small Nikon Canvas bag (better material and cheaper than the canon EOS DIGITAL bag they give) which can accommodate 2 lenses and body or one lens, one body and a flashgun (but you got to plan wisely on how to store your flashgun). I normally use this for events that i do not require much equipment


    (cred: http://www.7daydeal.com/media/catalog/product/cache/1/image/9df78eab33525d08d6e5fb8d27136e95/i/m/img_7197.jpg)


    If I need to carry more gear, then i use the bigger sling bag from Amazon. I prefer this because i can put one body and 4 lenses/ 3 lenses + 1 Flashgun / Water bottle. (although putting water bottle inside the bag might cause fungus to grow in your equipment so try not to do that). Although it looks dorky when bulky it still serves the purpose. Moreover if I carry my tripod, i would just strap onto the handles so i can carry as one whole set. It is also very cheap to get. I highly recommend this for newcomers

    AmazonBasics Large DLSR Gadget Bag


    to buy: (http://www.amazon.com/gp/product/B00CF5OHZ2/ref=as_li_tl?ie=UTF8&camp=1789&creative=390957&creativeASIN=B00CF5OHZ2&linkCode=as2&tag=beebom-20&linkId=IT5X7QS5ZFMPVANQ)

    But that being said,  Backpacks are still better, especially if you are travelling overseas. You can store laptop and lenses inside. Some bags cater more to camera equipment, some more towards storage of other things by user (meaning lesser space for camera equipment) so you have to see and think whether it suits you or not. Moreover it is paramount to get one with a TRIPOD HOLDER so that you can carry everything on your back and keep your hands free (also it can be pointless buying a camera backpack that doesn't have a tripod holder.) 

So that is it! hope that can give a clear picture on what gear you can opt for, but this is just my opinions so if there is anything wrong with it or maybe i could better talk about, please comment down and i shall reevaluate myself. 

Sorry for the delay of my post though.

See you in my next blog post!

BucketUrPhotos


20151108_162920-1.jpg (2973×1682)

Tuesday, 10 November 2015

Delay in Content Posting

Hey guys, just a short note that i wouldn't be active in blogging due to school work and all. Moreover i am still thinking on do. Meanwhile you can look at my instagram @qibcentric for posts and all. If you have any topics i can do on, you may wish to comment or DM via instagram :(

Thank you :)
BucketUrPhotos

Monday, 28 September 2015

EF vs EF-S Lens Showdown!

Welcome back to another post!

If you are a canon user, you might have known about EF lenses and EF-S lenses. You might sometimes wonder what are the differences. There are also myths pertaining to that and I'm here to clear em out!

In my previous post on CROP (APS-C) vs FULL FRAME, we talked about the types of DSLR available.

Now it is the type of lenses that are used in both systems.

EF lenses are both compatible with Full Frame and APS-C cameras.

However. EF-S lenses are only compatible with APS-C cameras. Canon's lineup of lenses made for APS-C cameras would not fit full frame bodies due to the extra black ring at the bottom of the lens mount. EF lenses don't have that which is why it can be used on full frame (and APS-C, since the black ring is 'extra')

If you look closely in the pictire, there is a caved-in black ring inside the 7DmkII (an APS-C DSLR) while the 5DmkIII (Full frame DSLR) does not have that

(cred: http://i.ytimg.com/vi/NBp_2wRmtrQ/maxresdefault.jpg )


There are two differences to take note of:

1) The Extra Black Ring on top of the lens mount.

 EF lenses do not have that as it is made to be used on Full Frame cameras which does not have the black ring. EF-S lenses on the other hand has that black ring.

(as seen here, the EF lens on the left doesn't have the black ring unlike the EF-S lens on the right)
(lenses used: EF 50mm f/1.8 STM on left & EF-S 18-135m f/3.5-5.6 IS STM on the right)


2) the mount labels.

 In APS-C cameras there will be two 'labels' - A red dot and a white square box on the rim of the metallic mount on the DSLR.


Full Frame Cameras however only has a red dot.


By now you might have figured out that EF lenses are the ones with the red dot, while EF-S lenses is the one with the White box. 

So now you might wonder why they even created EF-S lenses right? There's already EF lenses so why EF-S?


Back in the days, EF lenses were a bit expensive for normal people like you and me to buy. Since majority of camera users use APS-C sensor DSLR (since it is cheap and the best choice for beginners), Canon came up with the EF-S lens series - which is ONLY for APS-C and it is cheaper because it uses lesser amount of glass and optics to construct the lens.This is why normally in the market, the EF-S lenses are cheaper compared to EF lenses 
(excluding EF 50mm f/1.8 STM which is really cheap and the EF-S 17-55mm f/2.8 lens)


Moreover EF-S lenses are created to 'somewhat match' the focal lengths on a full frame.
For example, using a Canon EF-S 10-18mm lens on an APS-C gives an equivalent Full Frame field of view of 16-28.8mm

This is almost similar to the field of view on a Full Frame using an EF 16-35mm f/2.8 IS USM II L lens ( although on APS-C it doesn't really cover until 35mm but close enough)

There are also rumours that the crop factor (in APS-C DSLR) only works if you use an EF lenses but using EF-S lenses negate the crop factor. This is highly inaccurate.

APS-C cameras will have the crop factor (1.5x for Nikon etc and 1.6x for Canon) BY DEFAULT for ANY lenses used on it.. So don't be tricked by this.

Well that comes to the end of my blog post! Please do give feedback on what to cover and how to improve this page! Your feedback is very much appreciated!


Wednesday, 16 September 2015

CROP (APS-C) vs FULL FRAME: An In-Depth Analysis

Hey guys welcome back! sorry for the extreme delay for my new post as i was really busy with exams and all.

So yeah welcome to BucketUrPhotos! This is a blog about photography and i post contents about it and also give tips and tricks on improving or 'see from a wider perspective'

To address one of the reader's questions.......

"Can you explain what is the difference between a crop body and full frame body and what are the differences?"

So in this post i shall compare the two and ALSO give a more elaborated view on what sizes of image sensors are being used in our daily life

CROP vs FULL FRAME - What's that?


If you are a DSLR user you might have heard the word 'crop body' and 'full frame' before. So what is that?

(body = a DSLR but without the lens, hence the word body as it is literally just a body without the lens)

Basically a crop body is a camera body that uses an APS-C sensor and a full frame body is a camera body with a 35mm image sensor!

Hold your thoughts, I'm gonna explain what's all that about

You see, back in the days film was used and the 35mm format was known as the small format. As we ushered the era of digital photography, the 35mm format was then known as 'full frame' and was kept but was just too expensive due to its sensor size, thus the birth of smaller digital sensors such as APS-C and so on.

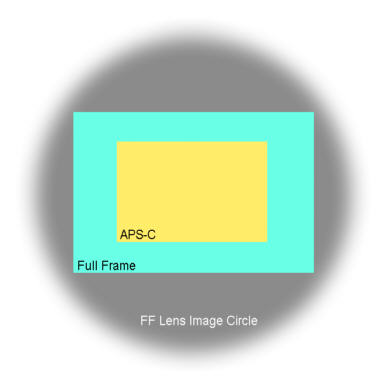
as shown in the pic, this is the comparison of the sizes (cr: http://www.bobatkins.com/photography/digital/fullframe/image_circle.jpg)


types of canon DSLRs series that are
  •   'crop bodies' (the '*' is denoted as the numbers you see on the body)
    1. -****D series, (eg 1000D)
    2. ***D series(eg 750D)
    3. **D series (eg 60D)
    4. 7D and 7D Mk II, which is an exception in the '*D' series 
  • full frame bodies
    1. 5D series ( mark I,II,III,s and SR)
    2. 6D
    3. 1Ds mk II, 1Ds mk III and the famous powerhouse the 1D-X

Okay but still what is the difference?

Well for starters, the crop factor

Crop Factor

To Explain crop factor, let's think of a scenario now

Imagine you are using a small rectangular hole to see what's on the other side and you can relatively see what is on the other side right? (equate hole to Full Frame)

Now, imagine that the rectangular hole just got smaller (equate to APS-C)

Can you see as wide as before?

That is what crop factor is about. In the example just now you realised APS-C is more 'cropped' (thus the name crop body') and has a limited Field Of View (FOV) unlike the Full Frame which has a wider view.

An example is shown here (cr:http://myfirstdslr.com/wp-content/uploads/2014/10/APS-C.jpg)

This further explains the definition of crop factor.

the crop factor for canon APS-C sensor is 1.6x and Nikon has a crop factor of 1.5x. this is applied by multiplying the crop factor to the focal length of your lens. (focal length is the number on your lens ,eg: 18-135mm, 50mm, 35mm. )

we shall take an example of the FOV of both bodies using a Canon 24-105mm f/4 'L' lens

On a full frame: 24-105mm
On APS-C (for Nikon) : (24-105mm) x 1.5 = 36-157.5mm equivalent ^
On APS-C (for Canon) : (24-105mm) x 1.6 = 38.4-168mm equivalent

^note: canon lenses do not fit Nikon bodies unless you have an adapter to do so

the calculations is made to determine the actual FOV on a full frame. Meaning 105mm on APS-C is as same as 157.5mm (Nikon) or 168mm (for Canon) on a full frame.

If you think about it, crop factor can be essential at some instances. For wildlife and sports you definitely need the crop factor to shoot even further without moving closer to the subject (especially wildlife- You wouldn't wanna go close to a lion right?)

Crop factor can also help if you want to shoot the moon. for example if you are using a Tamron 150-600mm lens, the crop factor allows you to shoot even further and up close to the moon (600 x 1.6 = 960mm) compared to full frame which can only be shot at a max focal length of 600mm.

But there is one more main factor that differentiates APS-C and full frame......


NOISE PERFORMANCE

Noise performance in APS-C is generally poorer than full frame. Full frame is better if you're shooting in low light as the noise would not affect as much as how it does on an APS-C sensor. Full frame has a bigger sensor so it isn't as dense as an APS-C sensor and therefore photos when shot on low light is not as 'grainy' as a shot from an APS-C camera

here is a photo as an example (cr: http://keyassets.timeincuk.net/inspirewp/live/wp-content/uploads/sites/12/2011/02/5d_vs_7d_images1.jpg )

As you can see the photos taken on the 5D mk II is not as grainy as the ones taken using a 7D. Due to the smaller sensor, the noise is more 'packed' and therefore more evident compared to full frame, as mentioned having a larger sensor and reducing this problem.

TYPE OF BODY

With exception to 7D series and maybe old discontinued models,  all APS-C DSLRs by canon is all plastic body and is not weather-sealed meaning if you are going to shoot in the cold or under tough weather conditions, it is not advisable to do so. 7D series uses magnesium alloy construct and is the only APS-C camera in the canon lineups that is able to withstand the tough weather.

Full Frame bodies are all constructed using magnesium alloy, except 6D which is a 50-50 on plastic and magnesium alloy.

All APS-C cameras have a built in popup flash while full frame does not have that (After all, Full frame is for the pros! They would use external flashgun and all instead of a pop up flash)

Now comes the ultimate question:

''Who are the target audience for both types of cameras?"

The answer is pretty obvious and simple. 

If you are just a beginner and on a tighter budget, you might want to start out with an APS-C DSLR and learn the fundamentals first. If you are taking it to the professional level, shooting in tough weather and require better noise performance and so on, full frame is advisable. (although 7D mk II kind of bridges the gap and relatively cheaper)


Saturday, 30 May 2015

Kick-Start Pointers 101

(HEY GUYS sorry for the extreme delay for my post! barely any time to even post stuff once semester  stared so yeah.

for newcomers, WELCOME TO BUCKETURPHOTOS! this is a place where you can learn, be it total beginner or intermediates, how to improve and all! more posts will be coming soon so yeah! )


So now you know how to use your camera and change the settings and so on? Congratulations you made past the first stage

Photography is mostly about creativity and telling your viewers a message or to captivate their hearts. For beginners you might also learn that sometimes the equipment you use doesn't really matter if you know how to manage with what you have. 

'Maximising the usage and maintaining the minimal equipment you have properly is better than having a lot of equipment and not knowing how to use it fully and unable to maintain it properly'
- A sound advice my teacher gave me before he retired. I found it really true. So what if you have those very advanced and big lenses when you don't know how to maximise its output?

So let me cut down the story and tell you the pointers you might need to follow


  1. Get yourself a proper kit. This is after you've mastered your basics and feel that you want to bring it to the next level. Just keep it simple. Usually my recommendation is a tripod, extra battery, 18-55mm or 18-135mm lens, a bag, and maybe a flash gun ( if you are into event coverage/ step up the game)
     If possible try to get a 50mm f1.8 portrait lens! it's the cheapest lens offered by canon and it does a pretty decent job! (review coming soon, if you could i suggest to buy the new lens as it's much better than the predecessor )


                  vs  
    50mm f1.8 ii, commonly known                           NEWLY RELEASED canon 50mm
    as the 'nifty-fifty' due to its price                           f1.8 STM lens, the much better
    and its cheap built                                                  upgrade of the predecessor.


    (crL http://www.kenrockwell.com/canon/lenses/50mm-f18.htm) and                                        
    http://www.audiovideopro.net/canon-launches-new-ef-50mm-f1-8-stm-prime-lens/

  2. If you are doing full-day shooting or those lazy to charge frequently and just want to 'take out and shoot' , i recommend you to get a battery grip. It is an add-on to your camera that enables to have a longer battery life and also allows you to take photos in the portrait orientation easily, as there's a shutter button and a dial at the battery grip. No more having a hard time taking portraits! The only disadvantage some might have is the weight. Adding that chunk might make some people uneasy to use the camera.

    for most battery grips, you have the option to either use 2 canon DSLR batteries or 6 AA batteries so it's more convenient


    BATTERY GRIP CANON BG-E8 FOR CAMERA CANON EOS 550D , 600D , 650D ,700D

    a sample battery grip, different battery grips for different canon DSLR models, so be careful when you buy one! (credits: https://www.tokopedia.com/prodigital/battery-grip-canon-bg-e8-for-camera-canon-eos-550d-600d-650d-700d)
  3. Shoot regularly and explore: and yeap, 'practice makes perfect' . You got to be well-versed with your camera - from camera settings such as ISO, shutter speed to knowing how to change them and many other setttings. This will also train you in a way to 'see' from another perspective. Remember: photography is about perspective. You are like the artist with the paint on his hands and canvas. You call the shots! (pun not intended). I usually practice during my vacation period and explore various places across the country.
  4. Experiment techniques: never be too scared to try out new tricks ( unless you're shooting for a school or office event, because that might be a little risky. Too many bad shots in the name of 'experimenting' might not be accepted by others) 

          Try to experiment with things such as 'bokeh' (that part where your background gets blur, more            coming soon!), symmetry and so on. Remember, it is like art, but digitally!


An example is experimenting with angles, here i mounted my tripod and set an angle about 40 degrees upwards. It gives a perepective of the 'bottom to top' effect!)


       This is a vanishing point type. As you can see, the pathway gets vanished somewhat at the end of         the picture. This could be symmetrical if both sides are 100% similar but they aren't this pic


Well that comes to a conclusion of this post! If you have any questions or any particular areas you would like me to cover, please feel free to comment in the box! 

Till my next post!

Follow me on instagram @qibcentric for more photos!


Sunday, 5 April 2015

ETA of next post

Hey guys welcome back! Due to unforeseen circumstances and all, i regret to inform that the publishing of my next post will be delayed. So yeah sorry about that!

Check out soon alright! It'll be done by this month!

Cheers!

Raqib Zaahed

Sunday, 22 March 2015

Developing The Eye: What can I take pictures of?

(Introduction: Welcome back to bucketyourphotos.blogspot.com ! This is a page for beginners who just pick up on photography and also for people to know more on how to improve in photography!)

(Now to continue where I left in my previous post!)

What can I take pictures of?

That might be the next question in your head right now. I mean, now you have a camera that works well. 

But what am I going to take pictures of? Surely not just something random and pointless such that people will criticise you for that. You want to take something that is eye-catching and captivates people right?

Well not to worry! I am here to give some ideas on topics you can take up to start your photography journey!

Photography isn't just restricted to some topics, there is endless exploration for photography.  

There are a lot of topics to choose from, but let me just name some of the topics i would like to share that might help the beginners (which will be explained at the later part )

  • Portrait
  • Architecture
  • Sunset/ sunrise 
( more topics might come in the future posts! sorry about the delay)

All of these requires you to explore. Exploring around your surroundings is one of the most important characteristics of a photographer. Reason being is that the 'perfect' moment only happens for a few seconds ( especially portrait photography). 

Now, you might wonder what i mean by 'the perfect moment' ? 

For example, a person is doing something that you think is 'cool' and you wanna take a picture of it. You got to do it immediately. Most likely chances are that 'pose' is not going to be there forever. You might regret that you didn't grab the chance when you had it 

Let's see an example below. When I was exploring the room I saw one of my teacher's band members practicing. And the spotlight shined above him at that point in time. I found it 'cool' and then i decided to take a shot. Luckily, I did it before he changed his pose.

Hope that would make you realise why you have to be aware of your surroundings


The 'perfect moment' is only for a while, in MOST cases for a few seconds. You got to be fast and make sure you grab it before you lose it! Remember, grab it or lose it!


Portrait Photography

Portrait photography is taking pictures of people (duh). Mainly it's taking a picture of one person who is expressing their feelings, mood through facial expressions or physical actions. 

In events, it is highly recommended to take pictures of the people who are performing, or audience who are watching the performance ( but make sure they don't see you with a camera aiming at their faces! Some might not like it and some will come after you and i'm so not kidding about that )

For portrait photography, make sure the subject is the one that is being focused, and nothing else. (ie: try to blur out anything that is distracting and when people see the photo, they automatically see the subject and nothing else)

To just focus on your subject, make sure you have a lower aperture value on your DSLR/ hybrid camera. Also, set your focusing system to only focus at one point ( some  cameras call it a one point focus/ single point focus, but you get the idea)

Here is an example of a portrait photo I took during my first public photo shoot


To make things even simpler, just follow this simple rule 

1) observe and wait for the moment
2) If you think there's something that is going to make people's expression change, prepare your camera and the setting required ( fast shutter speed, lower aperture, 1 point AF focus and so on )
3) Focus the camera at them and make sure all background details are blurred
4) shoot!

Sounds easy, doesn't it?

Architectural Photography

Architectural photography is relatively easy, if you take a picture of an infrastructure that just make people go WOW when they see your photo. The hard part? Finding an infrastructure that is unique and/or taking it correctly (ie: no shakes,  not under/over exposed, focused) and also most importantly, impressing your audience with your shot.


But for architectural photography, you do not need to be very fast in taking photos, as the object is still going to be there, so you can take things at your pace and achieve the shot you desire patiently. No point going fast in shooting and getting less impressive shots in the end. So yea, just go slow and steady.


Here is an example ( well this is just an average shot. I took this when i was a beginner )


But of course, for architectural photography sometimes it's best if you can show a variety of design, showing the most ATTRACTIVE AND UNIQUE part of the infrastructure than the whole building which looks not so impressive. 
Also, the setting. Be it cloudy, raining or anything. Sometimes, the natural background behind your architectural shots can make a difference. After all, 'nothing looks majestic without a touch of natural element'

The general equation, to be exact is as follows:
Nice architecture design + Natural background   = higher chance of the WOW factor among audience


Here is an example on how Natural background can make your photo nicer
(PS: the second one was post edited )


See? when you compare the shot I took when I was a beginner and these shot, which I took 2 weeks ago, the second set seems better, doesn't it?

That's what I meant, people, when i meant the fact that sometimes you need a bit of natural element on your architectural photos!

So yeah that's about it for architectural photography! Sounds easy ain't it? Just keep practicing and also look out for examples from real professionals on instagram, facebook etc and I'm sure you will also take good photos!

Summary
  1. Look out for nice and unique architecture ( be it the full building or a part of it)
  2. adjust camera settings and take the shot
  3. If you can, try to add the little bit of nature's touch in your shot ( eg reflections of cloud patterns while taking a glass building or nice orange sunset sky etc )
  4. if you wish, you may experiment and take pictures in different angles, and see which is the best among those you take. ( trial and error, it works sometimes)
Key thing is, NEVER GIVE UP, TRY, TRY AND TRY TILL YOU GET IT RIGHT :)


Sunrise/ Sunset Photography


This is pretty basic. Just adjust your camera setting to take it clearly, with details of clouds. It doesn't matter if the buildings aren't being seen. As long as there is an outline of it and it looks good it's fine ( this technique is mainly used in silhouette photography, but you can use it for sunset/ sunrise photography too! Photography can be of a mixed genre. )


Here is an example


For sunset photography, the detail of the sky and the surrounding matters the most. If there are people/ building that are just blacked out, make sure the outline of the object is there (the silhouette of the object). The main focus should be the setting: the cloud pattern, the colour of sunset and so on.  It's pretty basic as all you need to do is take a shot that is able to impress the audience.

Key notes
1) look out for really captivating sunsets
2) adjust camera accordingly and focus well, mainly on the details of the sky during sunset ( and also the silhouette of the person/ object if any )
3) shoot! :)

It takes tons of practice, so don't be disheartened if results doesn't turn out well. You can check out examples of sunset photography on the internet to have a better understanding

sounds easy doesn't it? :)

Well, that comes to the end of my post. Please do feel free to give feedback on how to improve my blog and what else you think i should cover on my next post!

Cheers!


Wednesday, 11 March 2015

Starting The Journey

So now you have the interest to pick up photography as your new hobby but don't know how to start? Not to mention these myths are making you even more confused?

Common Myths

  1. You DEFINITELY need to attend photography classes to learn the basics of photography
  2. you need very high end cameras and those really big and expensive lenses to be good
  3. you cannot learn by yourself and definitely need a tutor or someone to be babysitting you until you get it right
  4. You need equipment such as tripod, flashgun etc to even start photography

Well I am now here to tell you that the myths are both true AND untrue

Now, what do i mean by that?

1)  You might need photography classes to have a better understanding, but it is not LIMITED to that. You can even self teach yourself Photography by seeing online tutorials, books and so on. Classes might help, but if you know the basics more or less, I would recommend you to Self learn or ask your fellow friends who are also into photography

2)  True, high end DSLRs do deliver better photos compared to entry level DSLRs and entry level DSLRs deliver better photos than a normal compact camera. But as the saying goes 'Just because you are a striker doesn't mean you can score goals' . What matters most, in fact is WHO is using the camera. An Example would be A total rookie using a EOS 1DX performing not as well as a professional photographer who is using a EOS 700D, even tho it's clearly evident that the EOS 1DX outperforms the EOS 700D in many ways.


EOS 1DX, used by real professionals, costs a bomb 

EOS 700D, an entry level DSLR, mostly used by beginners and intermediates


    It doesn't really matter what camera you use to start your photography journey. You can even just start out with something like a canon Powershot SX60 or Panasonic LUMIX ( these are hybrid cameras, which is both compact and offer most functions of a normal DSLR except that lens is IRREMOVABLE) and then upgrade to a entry level/ mid range DSLR like a EOS 700D or better


Canon Powershot SX60 HS, an example of a hybrid camera. 

Panasonic Lumix FZ-18, another example of a Hybrid camera. Hybrid cameras have a pretty much same functions like an entry level DSLR but the lens is irremovable. 


    Then Lenses. If you are not going to take it full fledged or just a beginner, just go with the lens that comes with your kit. Lens does not really matter till you bring photography to the next level.


3) This is  bulls**t. Please Don't ever heed to this at all. You CAN INDEED learn by yourself. That's how I did, with occasional feedback from teachers, friends and photographers whom i met during events. What matters is whether you have the discipline and full will to learn by yourself. Remember, NEVER GIVE UP :) that is the most important and basic principle to follow.


4) Again, true AND untrue. tripods are essential if you want to reduce camera shakes, but don't rely on it too much. If you do that, eventually You will be a cripple without your tripod. At some places, you aren't even allowed to USE your tripods, so what will you do then? It's best to Practice without the tripod at the beginning. It's just like learning to ride a bike. You fall now and then and eventually you can ride steadily. Low light areas are really tricky so you can't avoid using a tripod. Only for THAT is an exception.

An example of 'NO TRIPOD' sign. it's very common to find in places like museums 
and exhibitions (cr: www.flickr.com) 


     Flashguns aren't really of a need unless you are taking it to the next level or being those event photographers. You can consider these at a later point in time, after you have developed the skills of photography, as you need to operate, sync etc with your DSLR. Moreover it isn't really cheap to get those so it's best to buy them when you feel you are ready and feel that you want to bring it to the next level


Hope that the misconceptions have been cleared. Now the question you might ask now is 'What do I do next?'

Well look out for my next blog coming real soon!


Introduction of this blog

BucketUrPhotos? Waddaya mean bucket your photos?

That's what you might have thought and don't worry it is the right thought to have in mind.

Yeah I know the feeling. I have no idea why I even used this name.  But hey, no one used it, so i won't be sued by anyone! So I'm safe from the legal aspects (well, i hope).

The thing is this. I set up this Blog to share my works, and to also give advice on common places for errors. Also, to prove that you can also learn photography by yourself and one day you can open a blog, like me!

It doesn't matter where, when or how you start. What matters is whether you can reach your goal or not. If you don't, go back to the drawing board and plan a better route. I'm sure you will be able to succeed in your journey of becoming a good photographer and eventually a freelance photographer for hire and earn some bucks.

Oh yeah, if you have any thing you would like me to cover for my next blog article or any feedback, do feel free to comment! I'm all ears open for improvements :)